Friday 18 November 2011

How to Make a Wool Felt Scarf (in Photos)


  A photo collection of the steps I take in making one of my handmade wool felt scarves. 

Laying out the layers. Base layer is striped blended Merino & Blue Faced Leicester roving. Second layer is a fine distribution of solidly died BFL wool roving laid perpendicularly to the first. 
Third layer of green BFL roving matches direction of first layer.
Wet down with hot soapy water & close up any gaps with extra green wool.
Netting down and light felting using felting stone and soap. All the fibers will stick to one another, but still can easily be pulled apart like a cotton ball.
Tending the edges making sure all loose fibers get worked back towards the center.
Felting by friction. Rolled up in bubble wrap and then a towel, the lightly felted scarf under goes increasing amount of pressure in rolling. Takes about 20 minutes of solid effort. I like using my legs and feet- it saves my back!
Felt! Now it is time for Fulling. Fulling is the tightening up and solidification of felt. The scarf can hold together on it's own at the felt stage, but is not durable. Fulling makes it into the fabric most people consider a "felted" item. Fulling = Hot water + throwing + punching + squeezing + rubbing + time
The finish felted wool scarf. Notice, it has lost almost half it's length and nearly a third of it's width. 


Visit www.entworks.etsy.com for more of my hand made collection of woolen products.

Wednesday 2 November 2011

Poppy Appeal

The Royal British Legion has started their Poppy Appeal and EntWorks is supporting the cause with felted wool flower pins. 100% of the profit will be donated to help "providing welfare, comradeship, representation and Remembrance for the Armed Forces community." 

For more information, please go to http://www.poppy.org.uk/

Monday 21 March 2011

Shooting Star

Just finished another project- a Waldorf inspired wool and silk shooting star for playing toss & catch. It's my first go at silk painting and I'm feeling a bit proud.

Wednesday 9 March 2011

Scottish Mutt Tutorial


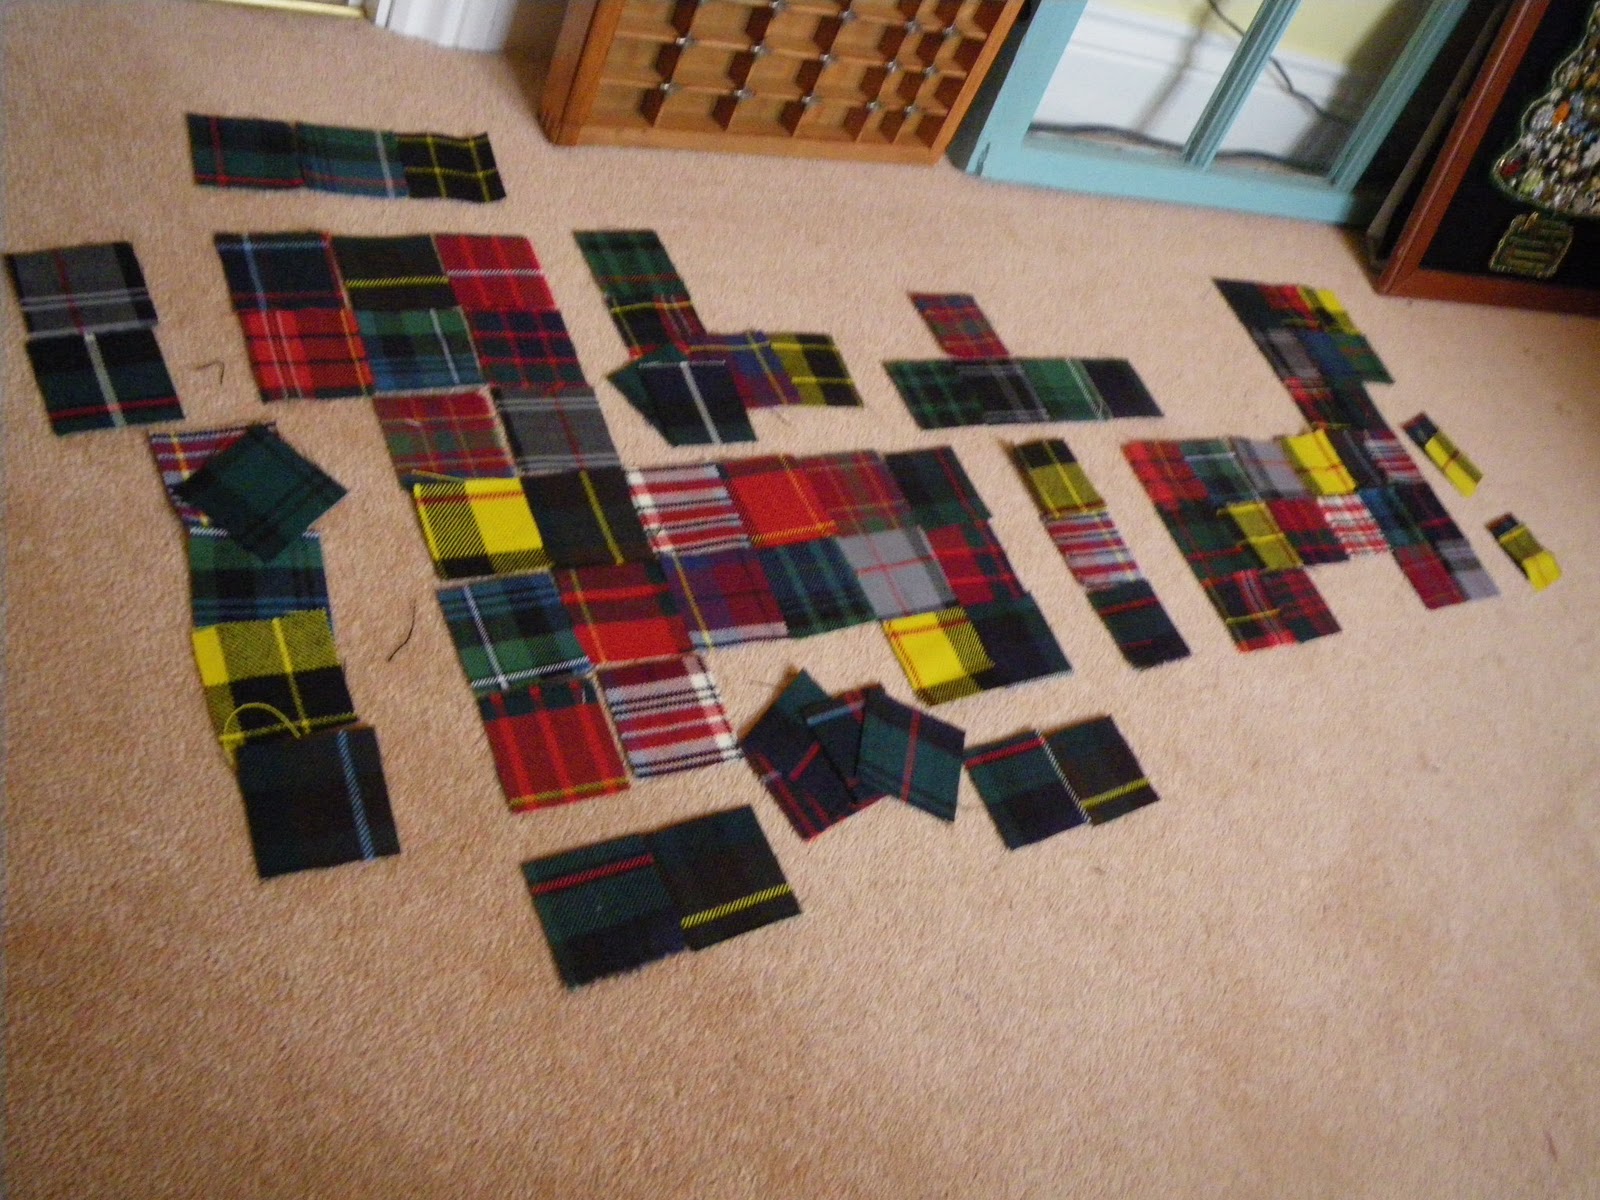
When I was a kid, my grandmother made me a quilted dog that I adored. I decided to re-create it for my little one to enjoy. To make it special for her, I used scraps of various tartans from our recent trip to Scotland.


Step 1: Cut 
You will need 96 2.5" x 2.5" squares. Cut out an even 100 to save yourself making extra later.


Step 2: Design and Pattern**
Arrange them how you choose on a large open area away from curious hand & paws. You will have a Left and Right sides (29 each/58 total), Left & Right ears (2 each/4 total), and the strip to bind both sides together (34total). **Please note, add one additional row of "feet"- Not pictured here due to seeing it needed it later in the process** 


Step 3: Sides
I gave myself a 1/4" allowance. You may increase the size of your squares if you feel comfortable with more of a seam allowance. You can also over lock the seam with a zigzag stitch or serger depending on your fabric weave. 

View from reverse side- no need to iron or clean up seams
Be sure you sew two Mirrored sides! If not, seam ripper to the rescue


Step 4: Ears
 Take 2 squares and stitch around three of the edges, invert, and iron flat. The unfinished end gets pinned on the back square of the head. Repeat for other side. 

Step 5: Binding 
Sew the remaining 34 pieces into one long strip with the same seam allowance. I have mine outlining the dog (not necessary to set up) because when quilting I hate having two patters touch. Just my own quirk.

Step 6: Join Side to Binding
This is the only time I pinned. Take the long strip and carefully start pinning at one foot with finished sides together. Wrap along edges until back where you started. Sew folding over corners as you go. Be sure that your pinned in ear is facing downwards and gets sewn into the seam between the side and the binding strip. 


Step 7: Join on other Side.
Repeat step 6 but this time be sure to leave open a few squares length for inverting and stuffing. 

Step 8: Invert & Stuff
Test all your seams to make sure they are strong. Correct any error before stuffing to save yourself a headache later. Stuff with bamboo, wool, or other filling of choice. 

Step 9: Eyes
Choose buttons eyes to bring your dog to life. 

Step 10: Love


Tuesday 8 February 2011

A New Chapter

I am now a proud member of the Natural Kids Team on Etsy. Bigger steps to come!

Monday 24 January 2011

Thursday 13 January 2011

Jumping In

Here's to a New Year and greater outreach into the digital world! My goal is to expand EntWorks this year and to do so I have to stretch out and get involved with the on-line community. Advice and help in this will always be welcome. A special thank you for all those who have supported me in my small shop. Now it's time to get BIG!

Please Become a Fan on Facebook to get updates on your wall.


www.entworks.etsy.com 
Entworks is now 20% any item with the coupon code FBFANS20.