Just finished another project- a Waldorf inspired wool and silk shooting star for playing toss & catch. It's my first go at silk painting and I'm feeling a bit proud.
Monday, 21 March 2011
Wednesday, 9 March 2011
Scottish Mutt Tutorial
When I was a kid, my grandmother made me a quilted dog that I adored. I decided to re-create it for my little one to enjoy. To make it special for her, I used scraps of various tartans from our recent trip to Scotland.
Step 1: Cut
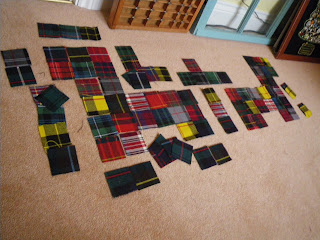
You will need 96 2.5" x 2.5" squares. Cut out an even 100 to save yourself making extra later.
Step 2: Design and Pattern**
Arrange them how you choose on a large open area away from curious hand & paws. You will have a Left and Right sides (29 each/58 total), Left & Right ears (2 each/4 total), and the strip to bind both sides together (34total). **Please note, add one additional row of "feet"- Not pictured here due to seeing it needed it later in the process**
Step 3: Sides
I gave myself a 1/4" allowance. You may increase the size of your squares if you feel comfortable with more of a seam allowance. You can also over lock the seam with a zigzag stitch or serger depending on your fabric weave.
 |
| View from reverse side- no need to iron or clean up seams |
Be sure you sew two Mirrored sides! If not, seam ripper to the rescue
Step 4: Ears
Take 2 squares and stitch around three of the edges, invert, and iron flat. The unfinished end gets pinned on the back square of the head. Repeat for other side.
Step 5: Binding
Sew the remaining 34 pieces into one long strip with the same seam allowance. I have mine outlining the dog (not necessary to set up) because when quilting I hate having two patters touch. Just my own quirk.
Step 6: Join Side to Binding
This is the only time I pinned. Take the long strip and carefully start pinning at one foot with finished sides together. Wrap along edges until back where you started. Sew folding over corners as you go. Be sure that your pinned in ear is facing downwards and gets sewn into the seam between the side and the binding strip.
Step 7: Join on other Side.
Repeat step 6 but this time be sure to leave open a few squares length for inverting and stuffing.
Step 8: Invert & Stuff
Test all your seams to make sure they are strong. Correct any error before stuffing to save yourself a headache later. Stuff with bamboo, wool, or other filling of choice.
Step 9: Eyes
Choose buttons eyes to bring your dog to life.
Step 10: Love
Subscribe to:
Posts (Atom)


